Trying to plan the unplannable with DDMRP
Following on from my last blog, about which parts are best suited to DDMRP, I now want to explain how DDMRP presents the information for the Material Planner to use.
To recap on the stages of DDMRP:
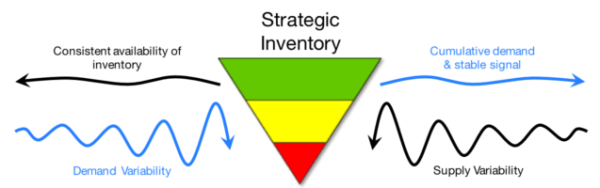
- Position: Bills of materials are examined to identify strategic items – materials or components – at critical points within the structures. In an adaption of the Theory of Constraints method, in which critical resources known as “constraints” determine production limitations, these key materials must be the focus of control above all other components.
- Protect: Availability of these critical items is also ensured by using inventory as a buffer. But this buffer inventory is not deployed as part of the initial MRP planning formula; rather, it is replenished dynamically as needed.
- Pull: Buffer inventory is managed through an innovative pull technique that continually monitors inventory levels and uses visual cues to maintain the buffer within a specified range.
This blog covers both the Protect and Pull stages in the DDMRP process and focuses on how DDMRP planned parts help Material Planners pick through the MRP action messages to find the real priorities.
Once Parts have been identified and Buffer Profiles set, based on level of actual demand – Supply Variability (risk of good quantity) and Lead Time Variability (risk of parts not being supplied on time) DDMRP calculates 3 buffer levels.
Red Critical Level – Urgent Action Needed. Replenishment orders need placing or existing ones expediting
Amber Action Required Level – Need to check on supply to make sure it is on time.
(Auto reorder point is when the quantity on hand passes from the Green zone to the Amber).
Green Sufficient stock available for current demand needs.
There are other numbers that show there is more stock on hand than needed (Black), and complete stock out (a darker Red).
The size of these zones is controlled by the lead time and supply variability settings. When starting out with DDMRP they are usually both set at High risk and as the changeover to DDMRP planning settles down they can be reduced.
A material planner can easily see which parts need to be actioned first. This is a big help, as it shows which parts are a real priority, regardless of the part lead time. Often planners are faced with a list of parts that have the same due date and they work down the list. DDMRP shows the ones that need to be actioned first.
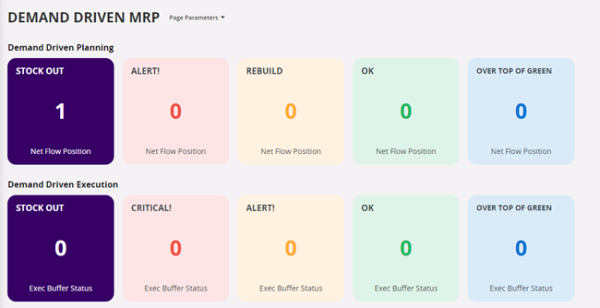
Example of a DDMRP overview screen
The size of these buffer zones will need to be recalculated regularly, to consider the ramp up during new product introduction, or the ramp down due to planned obsolescence. This recalculation background job needs to be run in advance of any material planning run.
These are the typical improvements organizations have seen from using DDMRP to control parts planning:
- 65% reduction in inventory levels
- 80% reduction in lead times
- 95% on time delivery performance
- 90% reduction in inventory obsolescence
- 400% improvement in inventory turns
- 25% improvement of planner availability
With the current challenges around supply chains, DDMRP gives manufacturers another tool to manage the ‘new normal’.
If this blog has been of interest, I would like to expand on DDMRP and show how it works and how it could help your business. Please let me know what you think in the comments box below or feel free to reach out via LinkedIn.
Discover more about IFS for Manufacturing here.